
CREATING A GOOGLE FORM
Use your favorite Browser (Google, Safari, Edge - Firefox has some issues) to Log In to the Google Account in Number 2: https://accounts.google.com/
Log In to the:
Account: SunCityHHEducation or SunCityHHCCEducation@gmail.com
Password: Pa$$word25!
If Google requests a Verification Code call Mark at 614-832-7931 and he will work with you to get you into the account.
Click on the Google Sheet Tab and Scroll Down to find the GSheet titled “Master: Instructors Class Scheduling Google Sheet” and double-click on it. This will open it.
Find the class for which you will create a Google Form and read across the row to the “Classroom, Zoom, Microsoft Teams” column in the Green & White area input by Instructors. You need to know which Google Form you are going to use. (Classroom, Zoom, or Microsoft Teams)
At the top of the Screen Click the “+” next to the Google Form Tab to Open a Second Tab.
Go to the “WAFFLE” in the upper right area and Click GOOGLE FORMS. It is a PURPLE icon.
Scroll down the list of Google Forms and find your name and the correct template for the class (Your Name - Template for Classroom, Zoom, or Microsoft Teams). “Double-click” on the proper template to open it.
This is a very important step: Go to the “Three Vertical Dots” in the Upper Right-Hand Corner and Choose “Make a Copy”. The program immediately prompts you to give the Google Form a New Name.
If NOT in Full Screen it will look like this:

If in FULL Screen it will look like this:

You will have a Google Form Tab and a Google Sheets Tab that are Side by Side at the Top of Your Screen. This will make it easier to “Copy and Paste” information from the Google Sheet to the Google Form.
Return to the Google Sheets Tab and Copy the Class title you are creating in Google Forms. Note the “Date & Time” the Class will be taught.
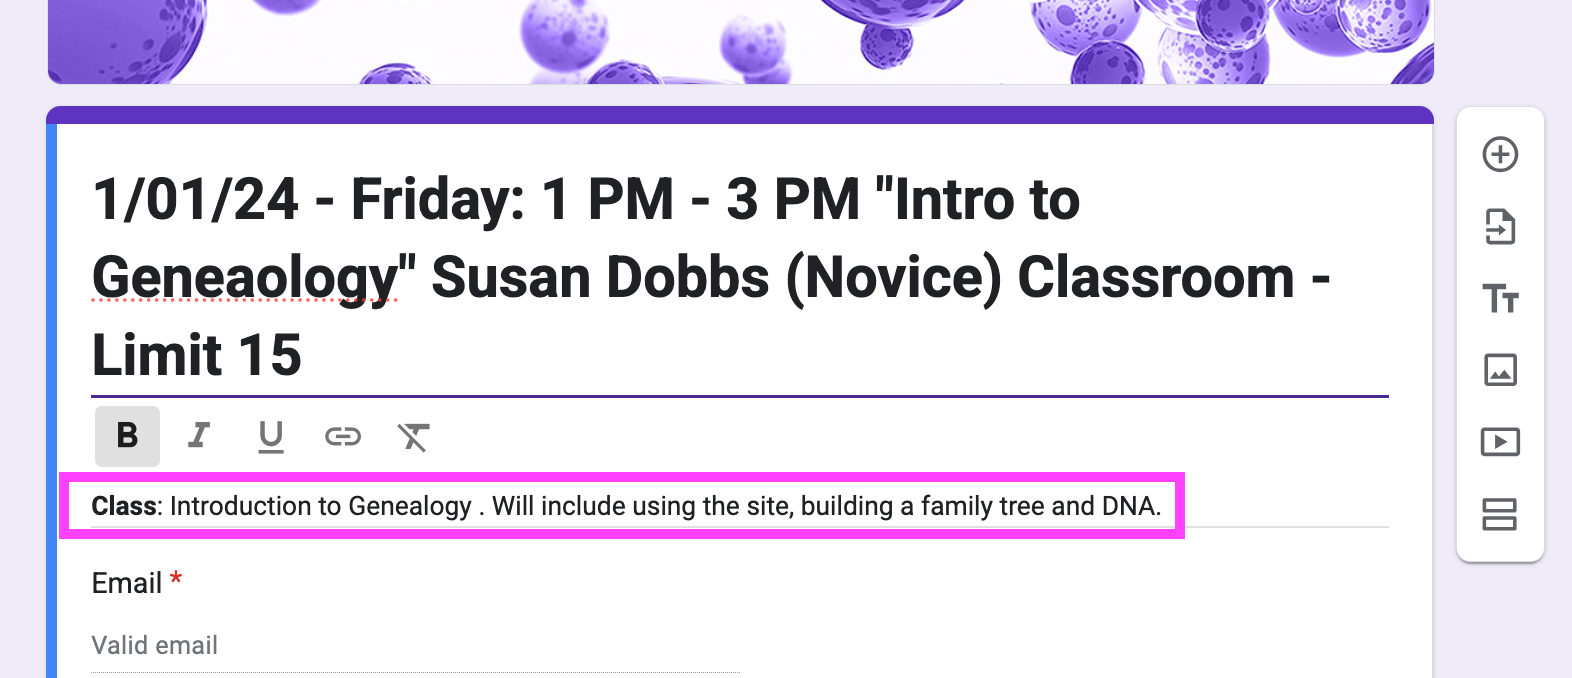
Return to the Google Forms tab and Title the Google Form at the Center of the Page. Currently, it indicates “unknown title.”
Here is the Pattern to use:
Type in “Date, Day, & Time of Class” (A “Dash” before the Day and a “Colon” after the Day).
Example: 01/01/24 - Thursday: 1:00 PM - 3:00 PM
After the Date, Day, & Time “Paste” the Class Title from the Google Sheet and place “Quotes” Before and After the “Title”.
Example: 01/01/24 - Thursday: 1:00 PM - 3:00 PM “Intro to Genealogy”
Type a “Space” then the Instructor’s Name.
Example: 1/01/24 - Friday: 1:00 PM - 3:00 PM - “Intro to Genealogy” Sue Dobbs
Now Indicate the Level (Novice, Intermediate, Advanced, a combination of levels (example: Novice/Intermediate) or All Levels) in Parentheses.
Example: 01/01/24 - Thursday: 10 AM - Noon: “Intro to Genealogy” Sue Dobbs (All Levels)
Add Where the Class will be Taught (Classroom, Zoom, Microsoft Teams).
Example: 01/01/24 - Friday: 1 PM - 3 PM “Intro to Genealogy” Sue Dobbs (All Levels) Classroom
After “Classroom” place a “-” and add “Limit is 14, 15, or 20.” This number is found on the Google Sheet in Column “L” (Max # Students).
Example: 01/01/24 - Friday: 1 PM - 3 PM “Intro to Genealogy” Sue Dobbs (All Levels) Classroom - Limit 15
Now that you have the full “Title” done in the “Center” of the Google Form “Highlight” the full title then “Copy” it to “Paste” it in “Step 13 “ below.
Example: 01/01/24 - Friday: 1 PM - 3 PM “Intro to Genealogy” - Sue Dobbs (All Levels) Classroom - Limit 15
Move up to the Title Area on the Left top corner of the screen Google Form and click on the words “Unknown Title” they will automatically “Highlight”
Now “Paste” the “Copied” title here.
Example: 01/01/24 - Friday: 1 PM - 3 PM “Intro to Genealogy” - Sue Dobbs (All Levels) Classroom - Limit 15 - Notice that only “01/01/24 - Friday: 1 P is all that shows. If you want to check it to see that it is all there (it will be) use your “Forward” key at the bottom right corner of your keypad.
Return to the Google Sheet Tab to “Copy” the “Class Description” from the Green area of the Instructors section.
Return to the Google Form Tab and move to the small type just below the “Title” in the “Center” of the page and “Paste” the information into the “Description” area of the Google Form. Typically the “Description” should start with the word(s) “Class, Hands-on, or Lecture.”
Now, go to the top center area of the Google Form and click on the “Word” Settings. (This area has the words: Questions, Responses, Settings all in a row.)
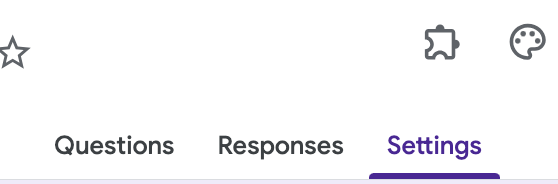
Click on “Settings”
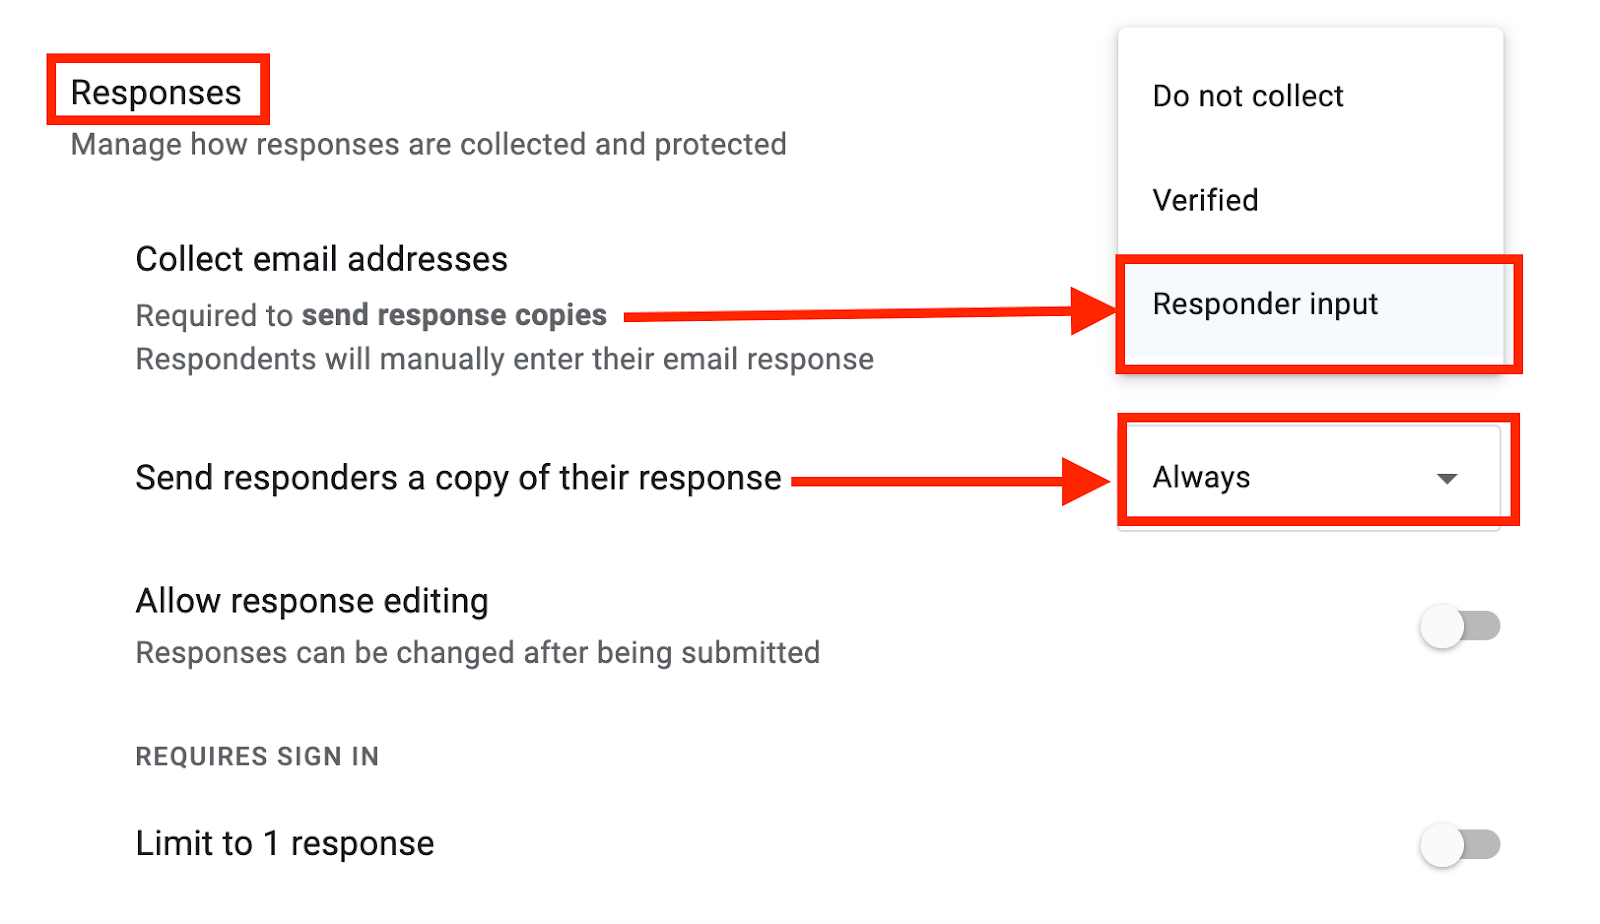
Scroll down to “Responses” (Below Responses it says: Manage how responses are collected and protected)
Click on the small down “Carrot” to the right of the white box and a menu will open:

Make sure Collect Emails is on “Responder input”
Send responders a copy of their responses, Click on the down “Carrot” and select- “ALWAYS”
Scroll to the next section “PRESENTATION” and Click on the down “Carrot”:
Scroll down to “Confirmation Message” and Click on the word “Edit”. “This is to confirm you have signed up for - erase the remainder of the message and replace it by typing in the “Class Title”, Day of the Week, Date, and “To - from” Time.
Example: “This is to confirm you have signed up for “Intro to Genealogy” on Thursday, Jan. 2, 2024, from 1 PM - 3 PM”.
FYI: The program will automatically send a confirmation email to attendees if s/he input his/her email correctly.
Finish this step by Clicking on “Save”.
You are finished in this area.
Publishing a Google Forms. (New Step)
Find the “Publish” icon in the top right corner and Click on it
If you are NOT in Full Screen, It may look like a “Paper Airplane”:

You will need to expand your screen until the work Publish appears.

Click on Publish and a new screen will appear.
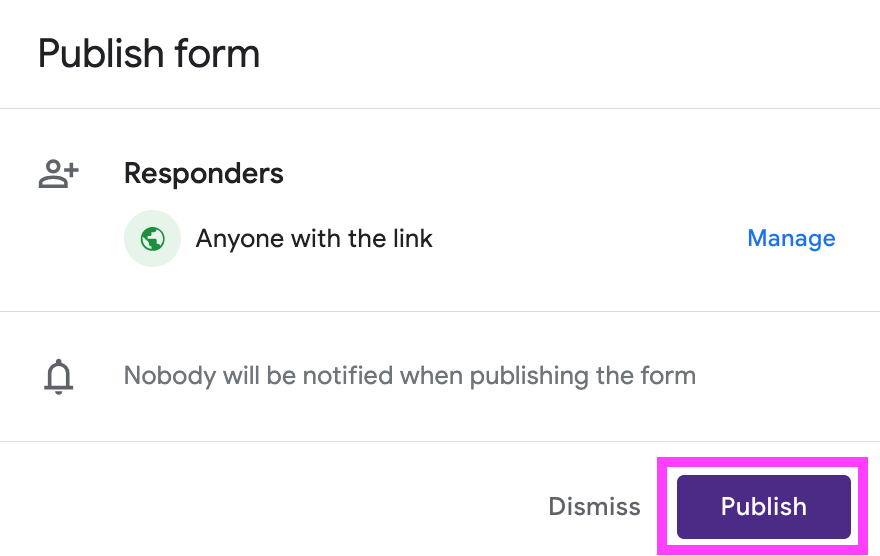
Click on Publish again and it will automatically collapse the screen and show “Published” as seen in the following illustration.
Once this is done you will now be able to move forward to select the “Link” for the next to last column (Column O) in the “Master” … Instructors Google Sheet.”
Generating the Google Form Registration
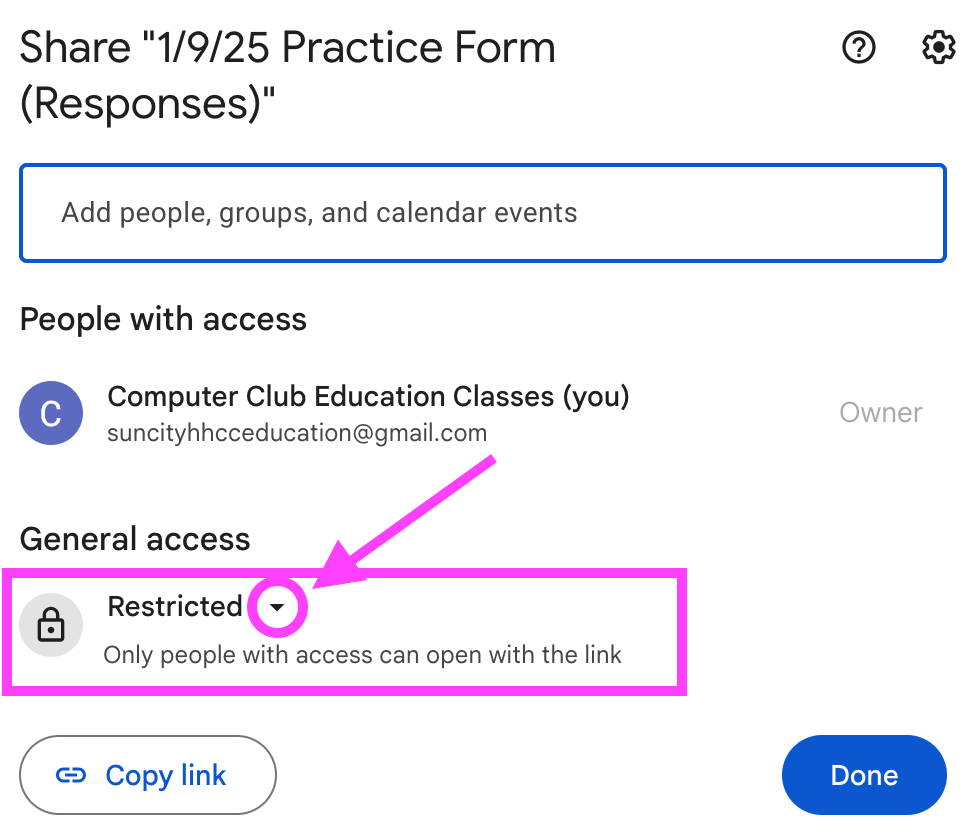
“Click” on the icon that looks like a person’s head to the left of “Published.”

Once you “Click” on this icon there is a “sub-menu” that appears with the proper title of the class at the top.
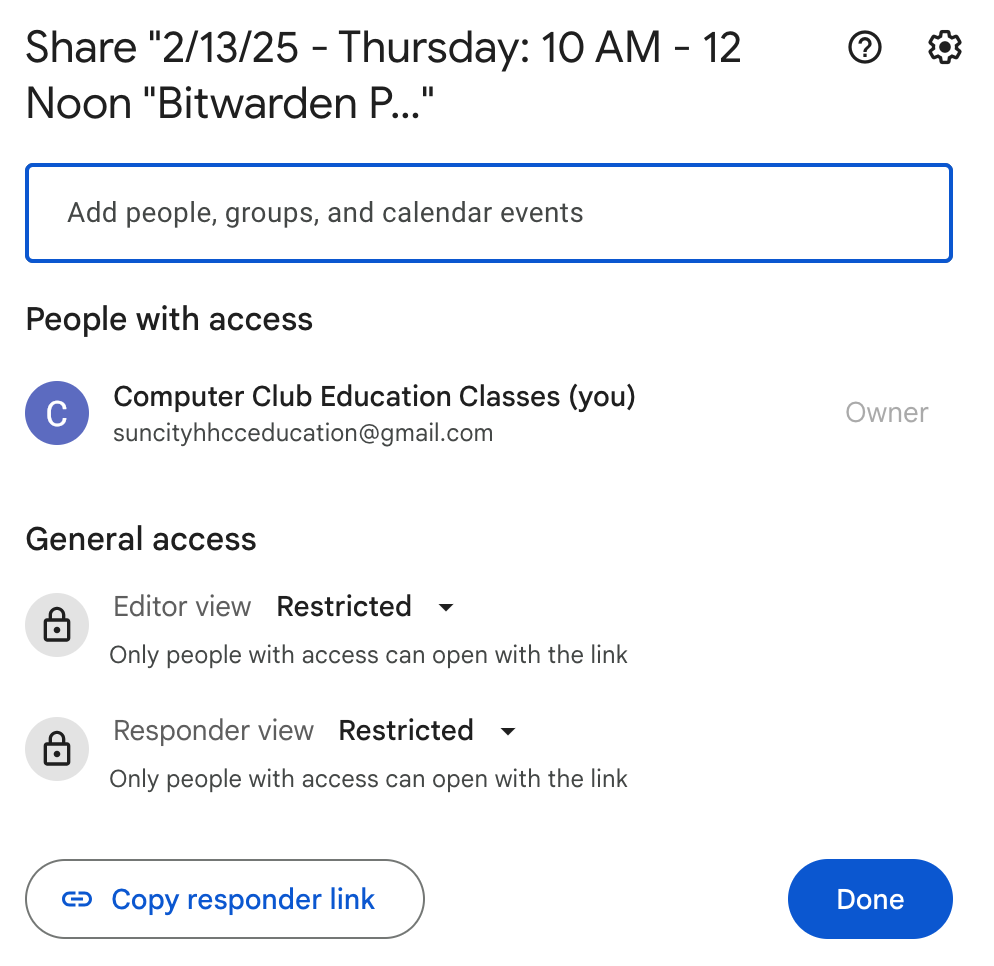
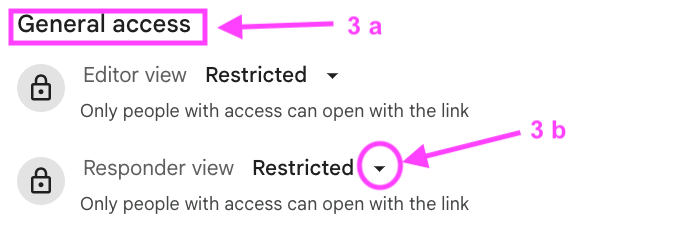
Under “General access” (3 a) you will see“ Responder view Restricted” Click on the small “Down Carrot” (3 b) to the right of the word “Restricted”
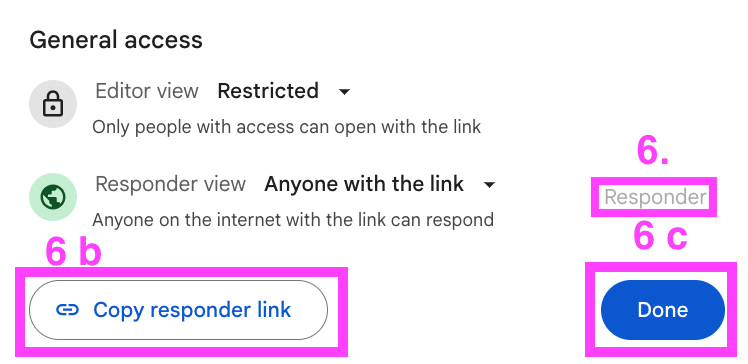
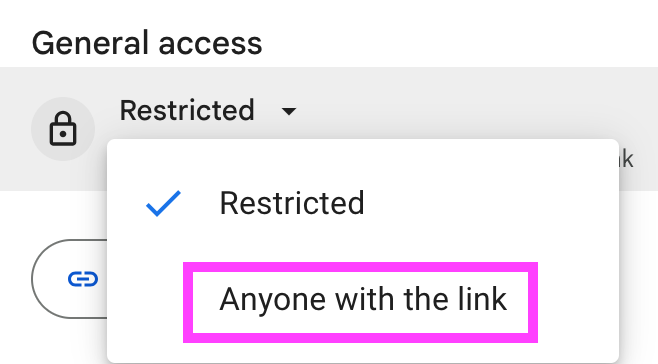
Click or release on “Anyone with this Link”.
The “Responder view Anyone with the link” is now on the screen. To the right side of the screen, in “Light Gray” the word “Responder” will appear.
Click on “Copy responder link”
Click on the word Done in the right corner of the screen
Once you Click Done you will be returned to the Google Form.
After you have “Copied the responder link” and Clicked on Done this “Link” will remain in your computer’s memory to Paste into the “Master: … Instructors Google Sheet” Google Sheet” later.
If your Google Form ISN’T in Full Screen here are your directions (If it doesn’t look like this skip to Step 9): Now you are ready to activate the add-on “Class Limiter”. This will shut off the registration once the class limit has been reached. This number is set by the instructor in the Green Area of the Google Sheet in Column L.
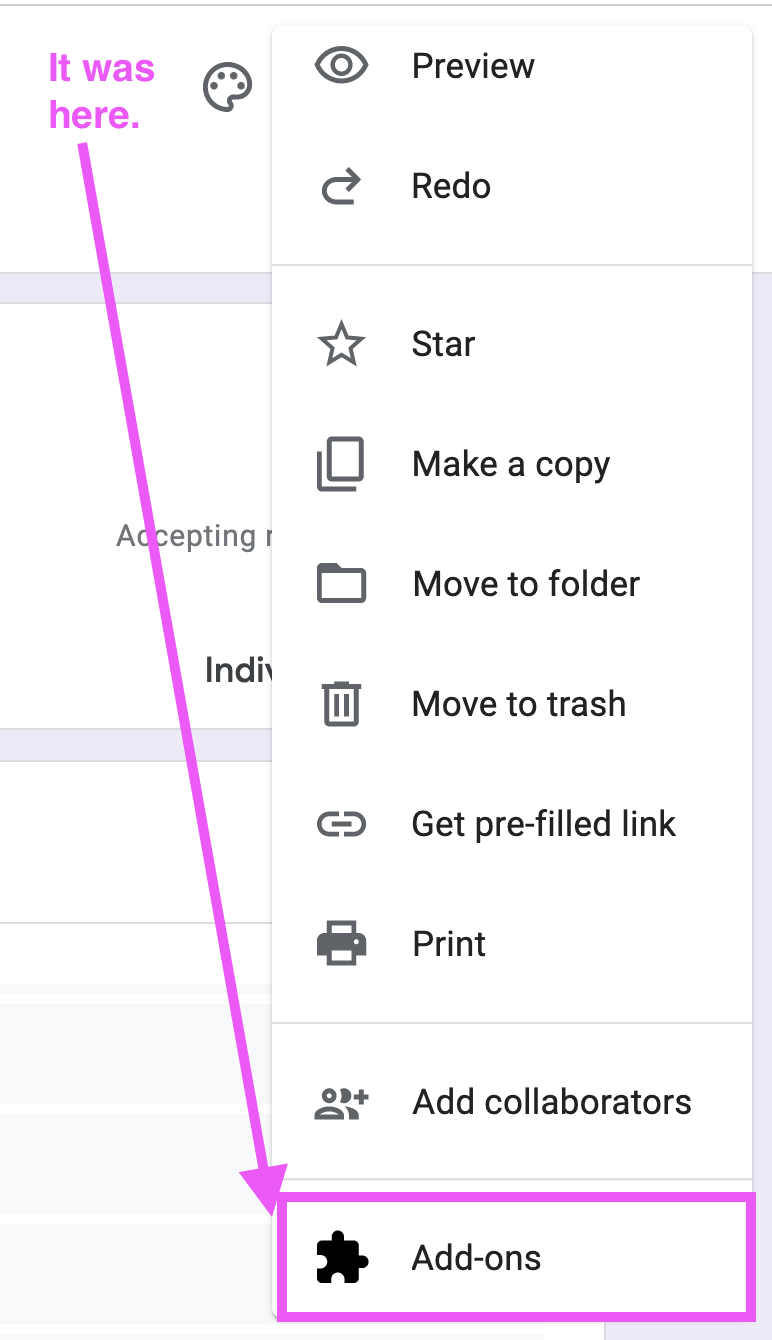
Scroll to the top of the Google Form and Click the “3 Vertical Dots” again in the Upper Right Side of the Google Form:

Scroll down to Add-ons and Click on it.
Now Click on “ClassLimiter”.
Set Limit and Help will come up. Select “Set Limit”.
FormLimiter will come up on the right side of the Google Form.
The Top Box is “Limit Type” Click in the box to see the Dropdown Menu.
Select “Number of Form Responses”.
Two more boxes will appear. The first box is “Stop Collecting Responses When Responses are Greater Than”. Type in one Number less than what the Instructor indicated the limit was for the Class in the Green Area of the Instructor Sign-up Google Sheet. (If the instructor stated a maximum of 20 type in 19.)
8. The second box is “Message when responses are closed”. The current message is “This form is no longer accepting responses, and has been set to automatically close by suncityhhcceducation@gmail.com.”
Replace the message: "This form is no longer accepting responses as the Class Limit has been reached.”
At the bottom of the Box click on “Save and Enable”.
If the “Classlimiter” does NOT close you will find an “X” in the Top Right Corner of the box. Click on the “X” to close the ClassLimiter.
9. If your Google Form IS in Full Screen here are your directions: Now you are ready to activate the add-on “Class Limiter”. This will shut off the registration once the class limit has been reached. This number is set by the instructor in the Green Area of the Google Sheet.
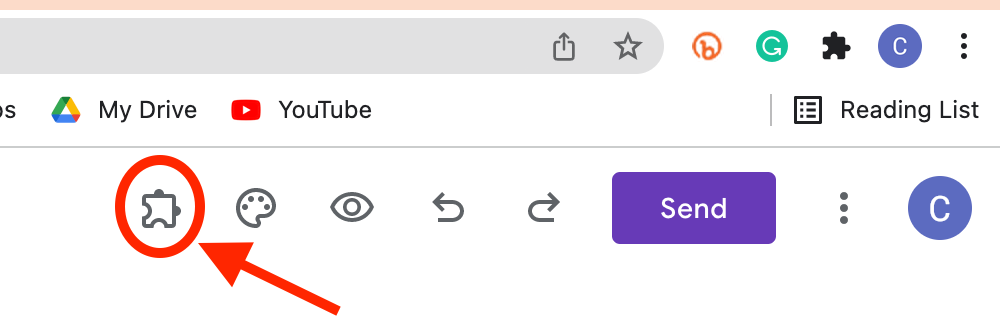
scroll to the top of the Google Form and Click on the First icon in the group to the right. (It looks like an arrow with a bump on the left and right side of the arrow.)
Now Click on “ClassLimiter”.
Set Limit and Help will come up. Select “Set Limit”.
FormLimiter will come up on the right side of the Google Form.
The Top Box is “Limit Type” Click in the box to see the Dropdown Menu.
Select “Number of Form Responses”.
Two more boxes will appear. The first box is “Stop Collecting Responses When Responses are Greater Than”. Type in one Number less than what the Instructor indicated the limit was for the Class in the Green Area of the Instructor Sign-up Google Sheet. (If the instructor stated a maximum of 20 type in 19.)
The second box is “Message when responses are closed”. The current message is “This form is no longer accepting responses, and has been set to automatically close by suncityhhcceducation@gmail.com.”
Replace the message with “This form is no longer accepting responses as the Class Limit has been reached.”
At the bottom of the Box click on “Save and Enable”.
If the “Classlimiter” does NOT close you will find an “X” in the Top Right Corner of the box. Click on the “X” to close the ClassLimiter.
10. Remember, the Google Form automatically saves as you make changes.
Returning to the “Master: … Instructors Google Sheet” in Google Sheets
Click on the appropriate “Tab” at the bottom of the sheet for the desired “Month” and find the “Class/Lecture” you are working on.
Scroll to the right to Click in Column O “Registration Link Used to Signup (Google Form Link).”
Paste the Google Form Link in this box. (There are three methods that can be used to Paste):
On a Windows computer hold down the “Alt” key on either side of the “Spacebar” and then with another finger press the letter “V.”
On a Mac computer hold down the “Command” key on either side of the “Spacebar” and then with another finger press the letter “V.”
To the left of the Google Sheet icon in the Toolbar, you will see the word “File” followed by the word “Edit”.
Click on the word “Edit”
Scroll down and release on the word “Paste”
There is no longer a method to “Shorten” the link, as we did in the past.
Return to the Google Form to Create the Corresponding Google Sheet.”
In the Center of the Google Form, you’ll see the words Questions, Responses, Settings.
Click on the word “Responses.”
Click on the Google Sheets icon followed by the words “Link to Sheets.”

When the next screen opens Click on the word “Create” in the top right corner
.

The next screen to appear will be in Google Sheets.
Creating a “Class Roster Link” in Google Sheets
The CLASS LIST Link is necessary for the Instructor to access the list.
Since you are in the Google Sheet you created for the “Class” in Google Forms
Click on the Big Share Button in the top right corner. (Not the “Down Arrow next to it.”)
When the next screen appears Click on the “Down Arrow” to the right of the word “Restricted.”
Select “Anyone with this Link” and “Release.”
To the right side of the screen, in “Light Gray” the word “Viewer” will appear.
Click on the small “Down Carrot” next to the word “Viewer” and select “Editor”
Click on the words “Copy Link” in the bottom left-hand corner of the screen.
Click on the word Done in the right corner of the screen
Now Click on the word “Done ” in the right-hand corner.
Once you Click “Done ” you will be returned to the Google Sheets.
You are finished with this Class’s “Google Sheet”. You can Close this Tab if you want.
Return to the “Master: … Instructors Scheduling Google Sheet” and Click on the appropriate “Tab” at the bottom of the sheet for the desired “Month” and find the “Class/Lecture” you are working on.
Now “Paste” the long URL into the Column N cell (the Last column).
The final step is to “Copy & Paste” the information into an email to the instructor. (The instructor’s email is in the “Green” section of the Google Sheet (Column H). Copy & Paste the “Row” for the Class/Lecture from Column A through Column N.
(Three methods can be used to Copy & Paste):
To Copy using a Windows computer, hold down the “Alt” key on either side of the “Spacebar” and then press the letter “C” with another finger.
To Paste using a Windows computer, Return to the email, click where you want to Paste, hold down the “Alt” key on either side of the “Spacebar,” and then press the letter “V” with another finger.
To Copy using a Mac computer, hold down the “Command” key on either side of the “Spacebar” and then press the letter “C” with another finger.
To Paste using a Mac computer Return to the email and Click where you want to Paste hold down the “Command” key on either side of the “Spacebar” and then with another finger press the letter “V.”
To the left of the Google Sheet icon in the Toolbar, you will see the word “File” followed by the word “Edit”.
Click on the word “Edit”
Scroll down and release on the word “Copy”
To Paste using this method, Return to the email and Click where you want to Paste hold down the “Command” key on either side of the “Spacebar” and then with another finger press the letter “V.”
Copy these emails to:
Mark Davis: davismarkt@gmail.com (Anywhere I can help)
Jeff Dembeic: jedlkn74@gmail.com (Calendar)
Carol Malcolm: lucym5020@gmail.com (Thursday Education email)
Judy Raney: computercac@gmail.com (Class Assistants)
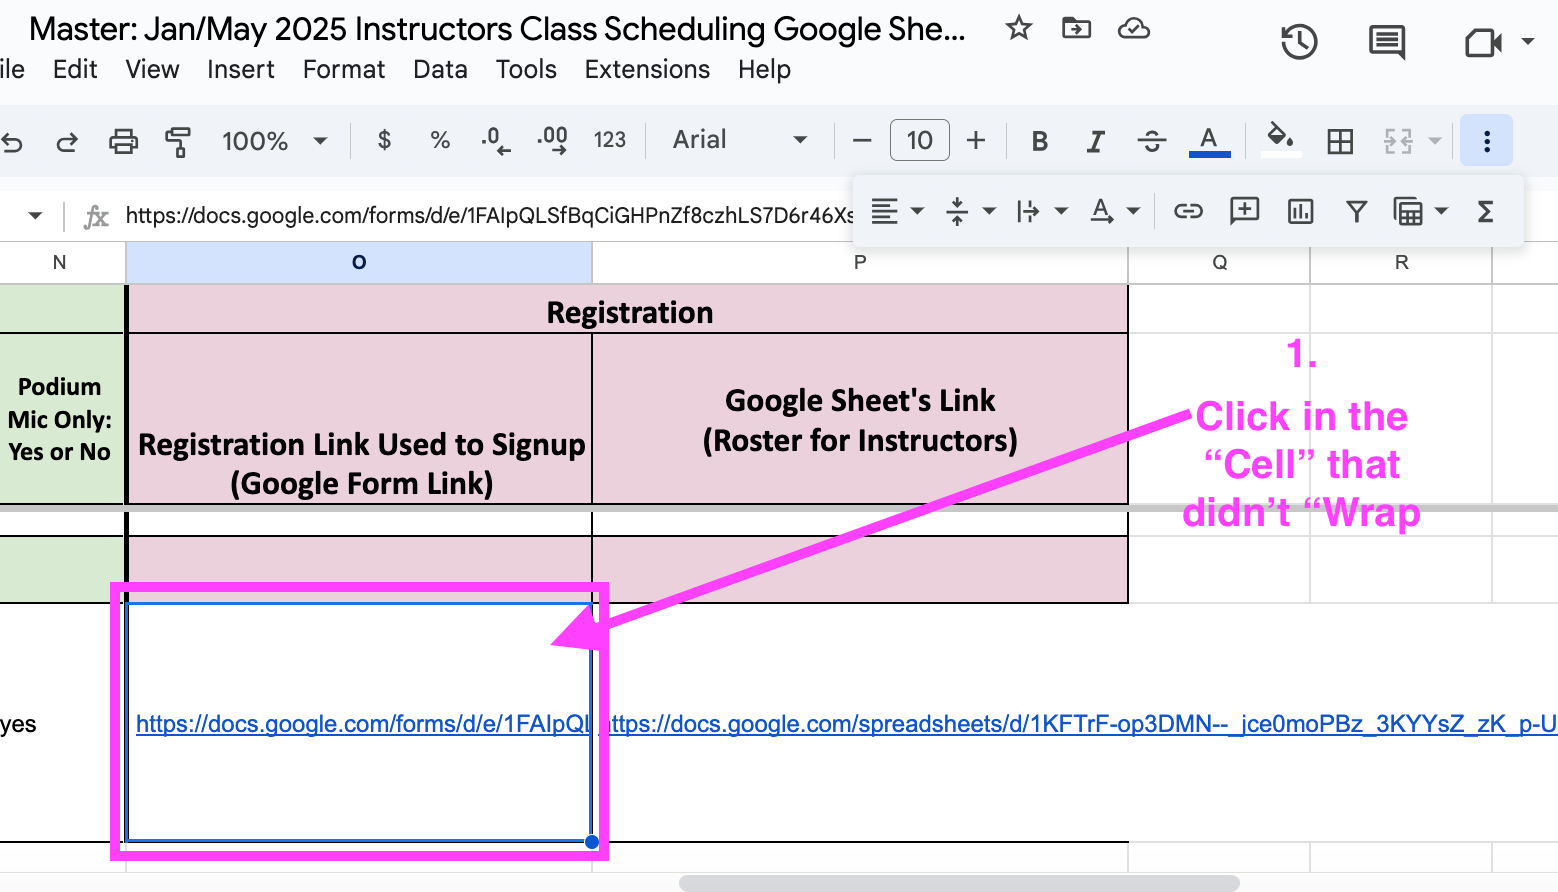
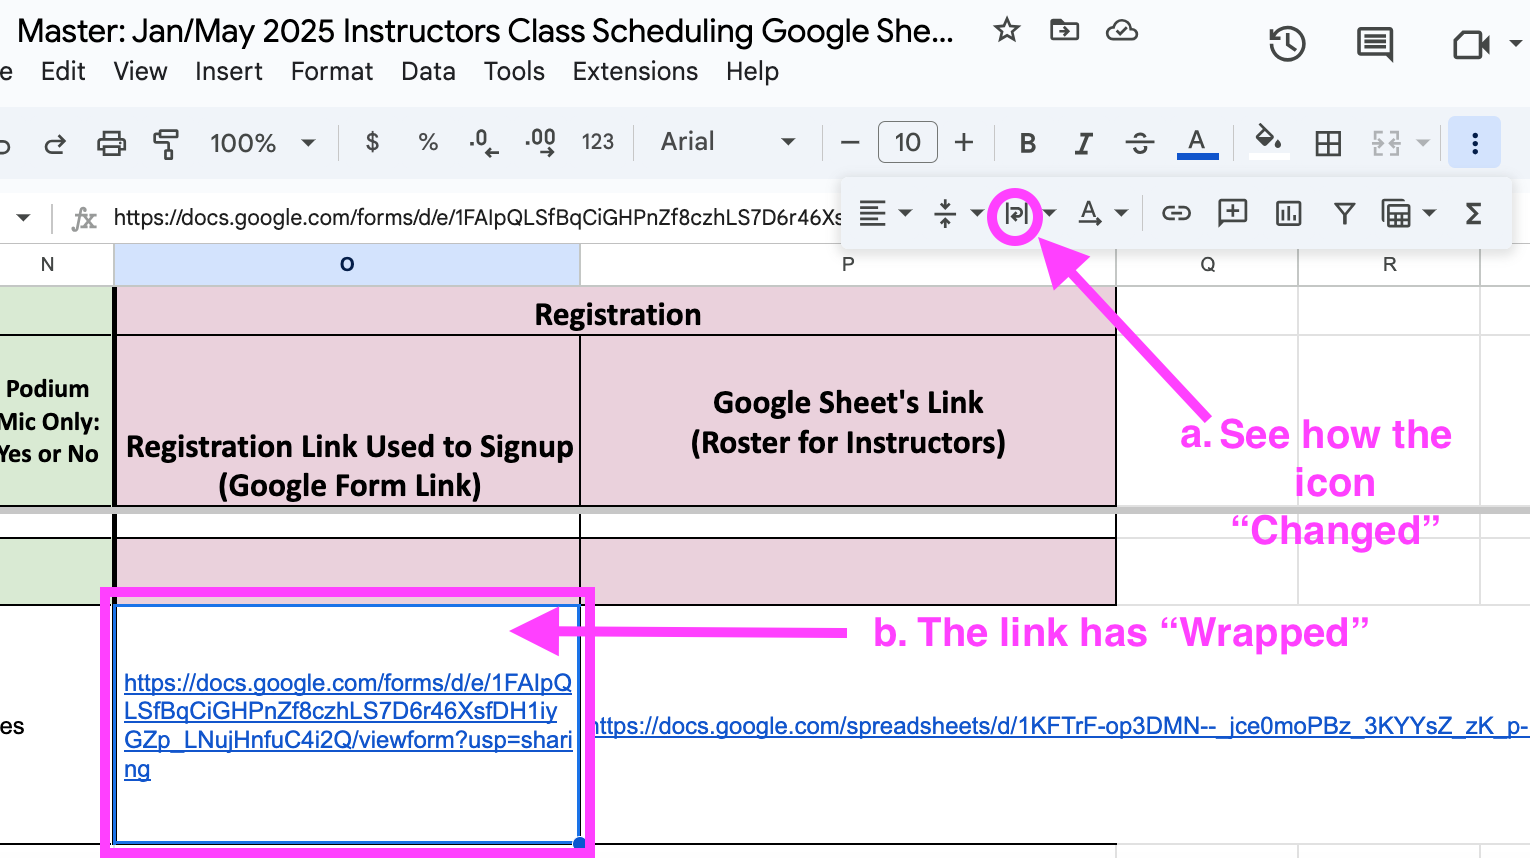
Supplement Information on correcting a Google Sheet “Paste” that doesn’t “Wrap” in the two registration columns (Column “O” and Column “P”)
When this happens, Click in the “Cell” that the “Paste” doesn’t “Wrap” but is a long link instead. In this case Column “O” and the “Cell” for this entry.
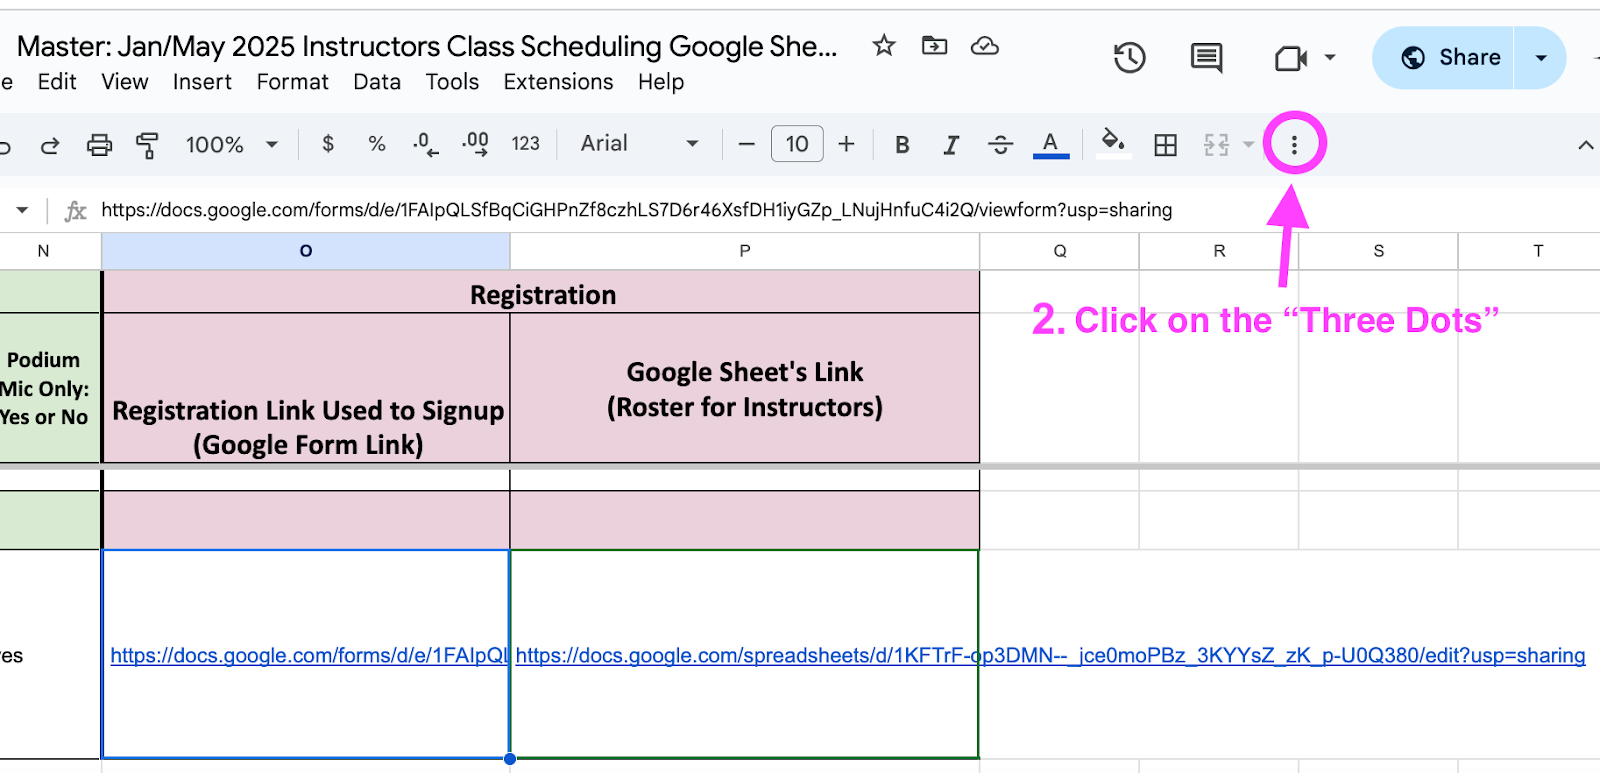
In the “Toolbar” click on the “Three Vertical Dots” at the far right.
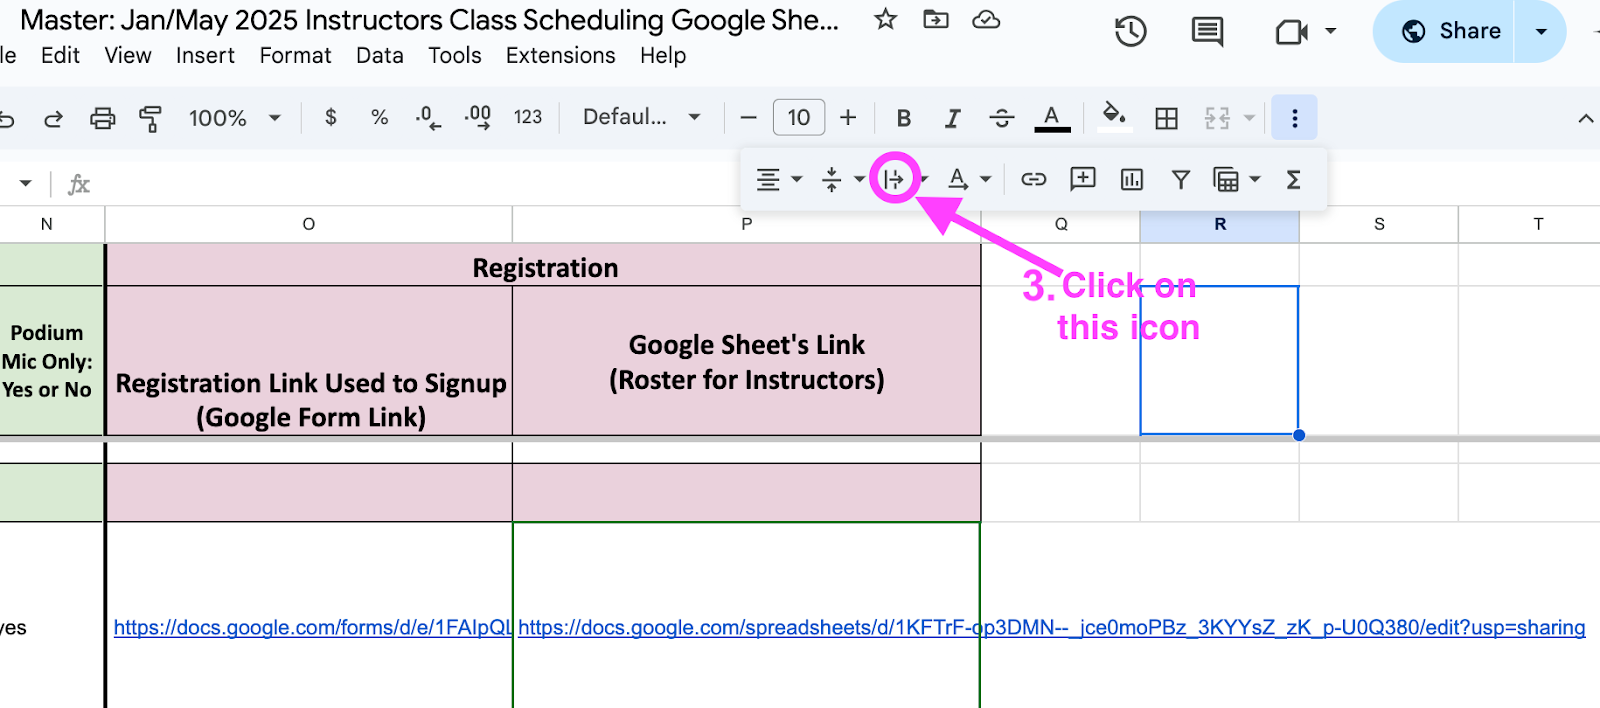
When the “Toolbar” expands, click the icon in the following illustration.
Click on the “Wrap” icon in the following illustration.
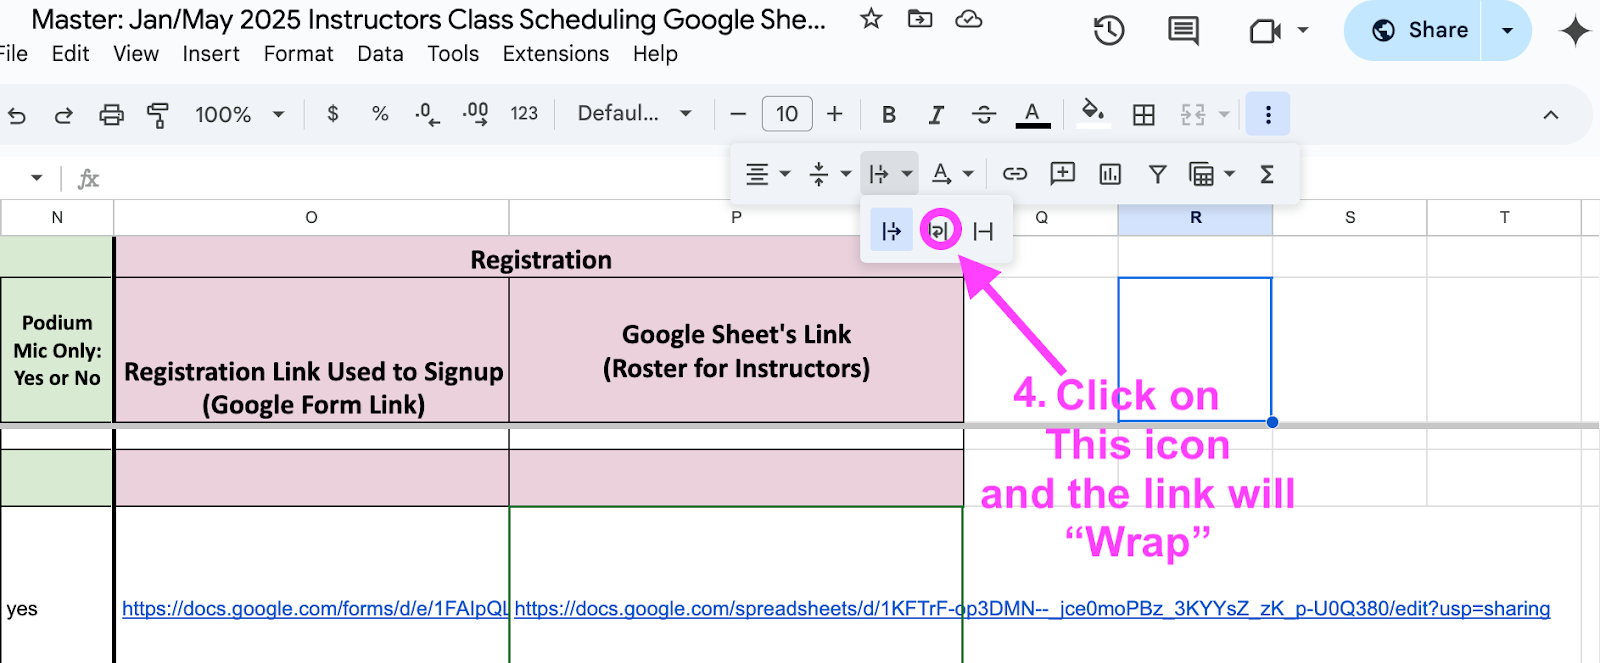
& b. When you click on the “Wrap” icon this is what happens.
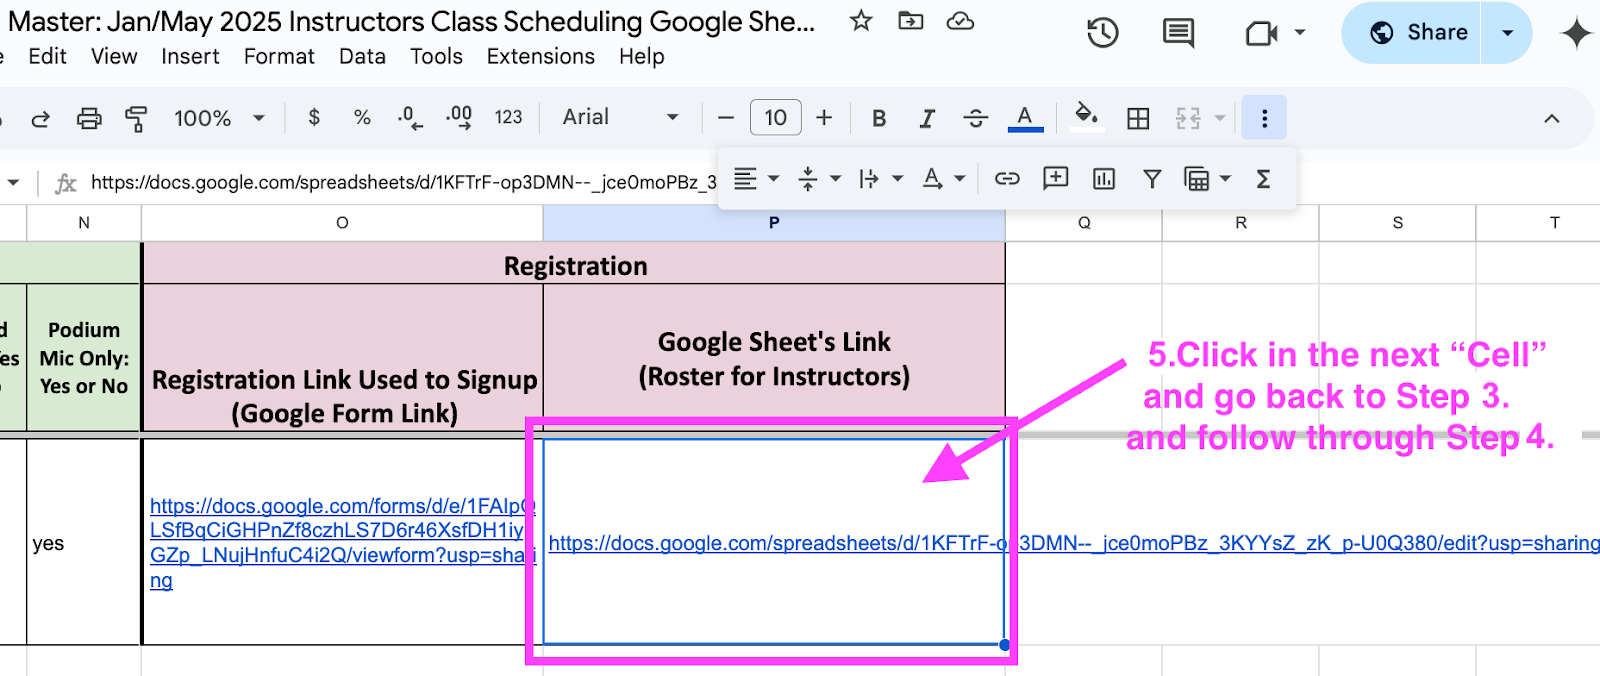
If this occurs again in Column “P” for the second link, return to Step 3 above and follow through to Step 4.
That’s it!